Building a Plastic Bottle Greenhouse
Web PDF • Imposed PDF• Raw TXT (OCR)













![Our goal with this greenhouse is to extend the growing season. But bear in mind that this building (as designed) does not have a heating system (like a wood stove) that will protect our plants dur- ing extreme (we are talking -10°F temperatures here) weather. So there are some limitations. Normally, when you stand inside the building you cannot fee] breeze - even if it is quite windy outside. The trapped air (within and around the bottles) appears to create a pretty effective seal. However, during gale-force winds I would not want to bet the ranch that this seal will remain as effective. ‘With this in mind, you may want to rig up a system of tarps or blankets that can be lowered around the bottle walls to protect the buildings contents during extremely harsh weather. That way you can tuck your plants in during a storm and keep them cozy. Alternatively, you may also want to rig up some blinds to limit the amount of sun coming into your greenhouse - as, even on a very cold sunny day - it can get pretty warm inside. Finishing off your project: Now s your chance to get creative. At this stage you have a room (about 8 square of usable space). Plenty of room to begin a rela- tively aggressive home garden. But to be a truly effective work space, you will need a few things. ‘These may include: Atable Storage for tools & supplies Shelves for your plants Potting soil container And even the kitchen sink (use your imagination - Annie incor- porated an old cast iron bathtub to grow greens) Suddenly 8 x 8’ doesn’t seem so terribly big. But f you are effi- cient in your design - it is plenty. Enjoy! page 31](building-a-plastic-bottle-greenhouse-jay-warmke 34.png)

Building a Plastic
Bottle Greenhouse
Blue Rock Station Style
Written by Jay Warmke
Edlted by Anme Warmke
‘w.bluerockstation.com
Published by Blue Rock Press
Text & lllustrations © 2008 Jay and Annie Warmke
Contact us at:
Blue Rock Station
1190 Virginia Ridge Road
Philo, Ohio 43771 USA
Telephone: +1 (740) 674- 4300
Email: annie@bluerockstation.com
www.bluerockstation.com
Printed in the beautiful hills of Appalachian Ohio, USA
Introduction:
Afew years ago, Annie and I did some consulting at a wonderful
place in Scotland called SCI (Sustainable Communities Initiats
you can find them at http://www.sci-scotland.org.uk/ ). This
Place is just as you imagine it should be. The original farm build-
ings stood tall, cold and silent, ancient stone mammoths carved
from the hillside. They overlook a deep blue loch (lake for the
more pedestrian among us) and soft green hillsides.
If you climb to the top of the hill, there stands a community gar-
den, constantly beaten by the crisp winds flowing off the bay. On
aclear day you can see across the Firth of Forth to Edinburgh.
At the base of the hill, near the lock they decided to build an
Earthship (Europe’s first) as part of an existing sustainability cen-
ter. This is what brought us to the ancient kingdom of Fife, but
while there an interesting little greenhouse caught our eye.
‘The small greenhouse was made mostly of 2-liter soda bottles...
simple in both concept and design. The idea was so cool, that we
decided to modify the process a bit and come up with our own de-
sign. As they say, there is nothing new under the sun (CSI got the
idea from a park ranger in northern Scotland who probably got
the idea from someone else who read about it somewhere in a
Shakespeare sonnet). So, off we go Horatio,
The ‘original las-
tic bote green-
house under
constuction near
Edinburgh, Scot
and,
Dage s
The Problem:
You already know the problem - or you would not have bought this
book. But maybe you are a bit fuzzy about the numbers.
‘The problem, simply stated, is that there are a lot of plastic bottles
cluttering up our world and our landils.
‘There is an interesting organization called NAPCOR (the National
Association for PET Container Resources) that knows more about
plastic bottles (they refer to them as PET, which sounds a bit
friendlier than polyethylene terephthalate).
Well, according to NAPCOR, only 23.5% of all the plastic bottles
‘manufactured in the US in 2006 found their way to the various re-
cycling centers. This is down from a high of 39.7% in 1995, but up
from a recent low of 19.6% in 2003. No matter how you slice it, a
whole bunch of bottles (4,152 billion pounds of the stuff, again ac-
cording to NAPCOR) found their way into our nation’s landfills in
2006. That's about 60 million plastic bottles thrown away each
day (according to the Container Recycling Institute).
From data n the 2006 REPORT ON POST CONSUMER PET CONTAINER RECYCLING
ACTIVITY, published by NAPCOR (www.napcor.com)
page 1
And these things don't seem to go away. Estimates range from “a
long long time to “many, many decades” to 450 years (from
Ocean Watch) to 1,000 years (often quoted by folks who have no
better idea than you or I - think about it - how many plastic bottles
were around at the battle of Hastings?)
One thing is clear from the data. We, as a nation, are buying more
and more plastic bottles (up 113% in the past 10 years) and recy-
clingless.Only about 4% of all plastic bottles are made from recy-
cled plastic bottles.
So how do we draw attention to this issue?
Thisis an ideal project
s for school groups -
helping them lear of
the waste cycle problem
as wellas giuing them a
un project to work on -
plus a greenhouse at
the end ofthe day.
Make Stuff Out of Trash:
We humans love a good visual. So why not build something out of
trash - sort of stick it right in front of our collective noses so we
can't easily ignore it? Which brings us back to the plastic bottle
greenhouse.
We have found that this project is a really cool way to demonstrate
the “reuse” portion of the 3-R (reduce, reuse, recyele) mantra.
School kids learn this concept once a year - around Earthday - and
then promptly forget it. This project s a great way to get classes
talking about the issue, collecting the bottles, then working as a
team to create the project.
page 5
Coming Up With Your Design:
Okay, here is were I am going to be of no help at all. Designinga
building falls into the same category as “How long is a piece of
string?” or “How deep is a hole?”
Basically, the project can be as big or as small as you wish it to be.
Bear in mind that the plastic bottles will not be structural in any
way. They are simply the fill material between the structural bits.
‘This gives you lots of flexibility.
‘What this means in practice is that your design can pretty much be
whatever you wish it to be, as long as you leave space between the
vertical supports that you can then fill with bottles.
But keep in mind, the larger the building, the more bottles you will
need. So start small and expand your horizons as you acquire
more time, patience, help and empty bottles.
In this booklet we are going to explore a few different concepts
first, then move on to the actual building. If you understand the
concepts behind the design, then you can sit down with your own
blank piece of paper and create a monument to your own clever-
ness. Don't worry, this stuff really is pretty simple.
So, as your design begins to take shape in the dark recesses of your
brain, there will be a few common elements that we all must face
as we move forward on this project. These include:
Permits
Site Location and Drainage
Orientation
Wind
Heat & Cold
Materials
PN
page 6
Our Design:
But first,just a sneak peak at the project that we are going to use
as an example in this booklet. 1 find it always helps to begin a
project at the end - with a clear goal in mind.” With that in mind,
we came up with our own design for a pretty cool greenhouse.
Feel free to copy this design (I will try to give you enough informa-
tion in this booklet to allow you to o that) or come up with some-
thing even better.
Our greenhouse has
a10" x 10’
“footprint”, uses old
tires as its founda-
tion, captures water
into two 55-gallon
rain barrels that are
part of the north
wall, uses a bit of
straw bale, and also
incorporates about
1000 2-liter pla
soda bottles. Neat,
huh?!
Permits:
We will ignore this area for very practical reasons (*Permits, we
don't need no stinkin’ permits...”)
First, the need for permits varies widely from location to location
(in our neck of the woods you don't need any permits for a small
outbuilding such as a greenhouse - in other areas you will pract
cally need a note from your doctor and a papal decree). So you are
onyour own. Check with your local code enforcement offic - or,
as Annie would say, “Ask forgiveness rather than permission.”
I simply mention this subject because you don’t want to find your-
self completing your masterpiece only to have some local official
inform you that you have to tear it down. So, if in doubt, talk with
your local building or zoning department. Get what they say in
Page 7
writing (if you can). Often what they will assure you s the law is
simply one person’s opinion of what they think the law means -
only to deny they ever said it later o be over-ruled by another in-
spector at some future date.
Site Location:
Itis usually a good idea to build your project on your own land
(and you thought there would be no useful advice in this book).
Seriously, though, make sure of your property lines before start-
ing. And while you are at it, you may want to check to make sure
you are not planning to settle your project on any easements, or
Violate set-back rules that will cause you heartache and heartburn
in the future.
So, assuming you have the right to build where you want to build -
there are just a couple other practical considerations in locating
your greenhouse.
First, remember you are trying to capture the sun in the au-
tumn, winter and spring for as much of the day as possible. So lo-
cate the structure where there is sun (duh!). This means, keep it
away from tall buildings or structures that will block the sun and
(this is probably more an issue) try to steer clear of any trees that
will shade the building
When in doubt, we like to mark out the building (small orange
flags are nice) and then study the site for a while. Check at differ-
ent times of the day and (if you are very patient) at different times
of the year to see how the sun hits that site.
Another site consideration is water (specifically, drainage). No-
body likes to live in a swamp (well, maybe some folks do - but they
are likely not building a greenhouse), so let’s avoid this if we can.
Ifyou are building in a low, wet area, you may need to build the
site up a bit to ensure adequate drainage.
On a sloped site, you may also wish to consider building “French
drains” around your project to help channel water away.
page s
French Drain - ust atrench around the buiing (on as
many sides as necessary) fled with gravel or rubble
(pertorated drain pipe an option) to help channel water
Fill with ey
stone or
rubble:
\ Foundation
Perforated pipe
In dry climates this may not be an issues. But if surface water may
be a problem - this is a cheap and effective way to make that prob-
lem go away. Also, it is much easier to do at the time of construc-
tion (when you have the motivation and perhaps, even, a bit of
help) than trying to tackle it later
Orientation:
For the sake of this book, we are going to assume that you live in
the Northern Hemisphere. For those of you who live down south,
If passibl, algn your greenhouse so it
faces just east o south. This willake ad-
vantage of the moming sun (heating the
buiding earferin the day).
South Facing Morning Sun
page 0
you are probably used to living upside down - so just reverse ev-
erything.
S0 on most days (we hope), the sun rises in the east, sets in the
west, and depending on your position on the globe and the time of
the year, tracks across the southern sky,
“This is important for several reasons. First,if it didn't do this we
have bigger problems to deal with than building a greenhouse will
solve. But secondly - assuming all is well with the universe -
knowing where the sun is and will be is very helpful in creating an
ideal growing space for your plants. Orient your building to ab-
sorb as much of the winter sunlight as possible.
‘With this in mind, the northern side of your building is a total
waste of space. It will never get any sun, and is, in essence, a giant
sucking hole that will sap your building of heat if given half a
chance, We will discuss later in this book how to use this space to
our advantage.
Wind:
Because we are trying to locate our greenhouse where it gets plenty
of sun, the site may also be quite exposed to other elements of na-
ture. Simply bear this in mind when planning your greenhou
‘This is the voice of experience talking. One of our early prototypes
of the plastic bottle greenhouse was picked up and dismantled
during a particularly nasty storm. This particular prototype was
designed to me mobile (we moved it from place to place for dem-
onstration purposes) - but that mobility was supposed to be at a
time and place of our choosing.
S0, as you are selecting the location for your greenhouse, bear in
mind that weather is unpredictable and often harsh. Use wind-
breaks where necessary and practical, or make sure your structure
is firmly anchored.
Often folks like to construct their greenhouse directly adjacent to
their home or another building. This will certainly help protect the
page 10
A greenhouse anchored o the south
side of a buiding will certanly protect i
from northem winds.
more fragile greenhouse - just make sure you still have good expo-
sure to the southern (and hopefully eastern) sky.
Heat & Cold:
Now, of course the entire reason you build yourself a greenhous
to create an environment where it is warmer inside than outside
(with lots of light so your little plant friends will be healthy and
happy).
So you obviously want it to absorb those passive solar rays, build-
ing up heat within (hence the name, the Greenhouse Effect) and
making it warm and toasty inside, even when it s cold outside.
Essentially a greenhouse is a very large solar oven. Here at Blue
Rock Station we often cook with solar ovens and let me assure you,
they can get awfully hot inside. On a sunny day, those little ovens
can easily reach temperatures hot enough to boil water (212°F or
100°C). Even on a cloudy day the temperature will reach about
100°F.
‘The reason I mention this, is that your design must incorporate
some way to vent out excessive heat. Small windows at the pe:
(hot air rises don’t you know) that can be opened are a good way to
allow hot air to escape are a good idea.
page 11
Your plants (and you for that matter) don't like extreme tempera-
tures. Obviously you don't want to cook your plants (until you are
ready) - hence the vents. Also, you don’t want them to freeze. So
there are a couple neat (and cheap) ways to keep your litle leafy
friends warm.
These methods includ
v Passive Solar
v Thermal Mass
¥ Heat Absorbing Materials
v Insulation
Passive Solar:
‘Well now, here we are at long last at the entire point of a green-
house. Greenhouses work by allowing the rays of the sun to pene
trate into the building, but then block the heat from escaping (to a
point) resulting in the interior of the building growing warmer and
warmer.
Intuitively we know that clear items will allow the sun’s rays in -
and opaque (or dark) items will block the sun. Since we intend to
build the walls of our greenhouse out of soft drink botles - we will
need to collect clear bottles. 1t is through this wall of clear bottles
(and remember to use clear bottles) that passive solar heating will
work its magic.
Thermal Mass: The Earth is Your Friend
In our design, we are also going to use the earth to provide ther-
mal mass, assisting us in keeping the greenhouse at bit warmer
when it is cold and miserable outside.” The earth also will help
keep things a bit cooler when it is hot. The earth moderates the
temperatures - radiating heat when it is cold and absorbing heat
when it s hot.
“This is the same effect you feel when you enter a cave. The earth
maintains a fairly constant temperature (below the frost line that
page 12
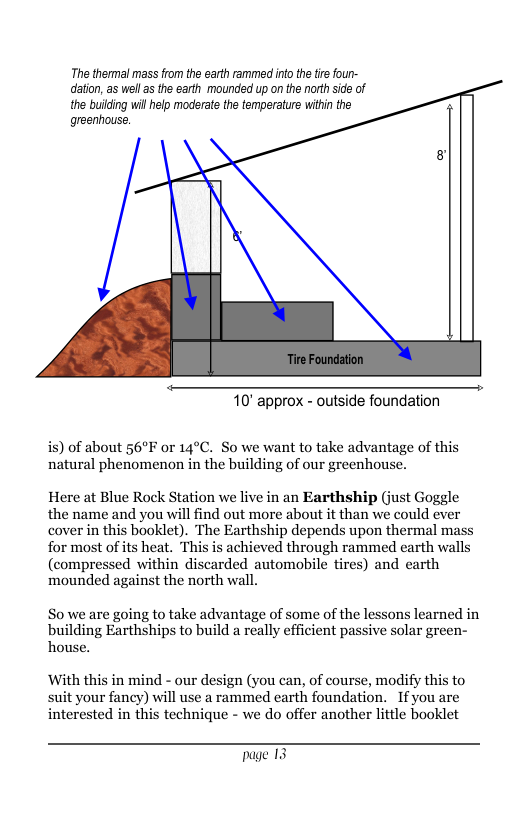
The themal mass from the earth rammed ino th tre four-
dation, as wel as the earth mounded up on the north side of
the buiding will help moderate the termperature within the
greenhouse.
10" approx - outside foundation
is) of about 56°F or 14°C. So we want to take advantage of this
natural phenomenon in the building of our greenhouse.
Here at Blue Rock Station we live in an Earthship (just Goggle
the name and you will find out more about it than we could ever
cover in this booklet). The Earthship depends upon thermal mass
for most of its heat. This is achieved through rammed earth walls
(compressed within discarded automobile tires) and earth
mounded against the north wall.
So we are going to take advantage of some of the lessons learned in
building Earthships to build a really efficient passive solar green-
house.
‘With this in mind - our design (you can, of course, modify this to
suit your fancy) will use a rammed earth foundation. If you are
interested in this technique - we do offer another lttle booklet
Dage 13
(Building a Tire Foundation) that goes into great detail on this
subject.
Remember, we noted that the north side of the building is of no
use at all - from a solar gain perspective. It will never get any sun-
shine - so why waste our time building a bottle wall on that side?
And why not mound some dirt up against the tire foundation on
the north side? This will help in temperature control as well as
drainage. The lttle bit of earth we will mound up in the example
outlined in this booklet will not change the temperature much -
but you could expand upon this, even building into the side of a
hillside. Such a design would benefit greatly from the thermal
mass of the earth.
Polluton is nothing but the resources we are not har-
vesting. We allow them to disperse because we've
been ignorant of their value.
- R. Buckminster Fuller
Materials:
Buckminster Fuller (designer of the geodesic dome - among other
things) was certainly right. We have already produced everything
we need.
One of the really cool aspects of this project is that it takes things
that would normally be thrown away and gives them a useful sec-
ondlife.
‘The materials we will use in this project are:
Discarded automabile tires (for the foundation)
« Reclaimed lumber (for the framing)
o Plastic bottles (to provide walls as well as insulation)
Straw bales (infinitely renewable and often discarded)
Water (don't forget that rain falls from the sky, often wasted)
page 14
Heat Absorbing Materials:
‘When it comes to absorbing heat, black is your best friend.Paint-
ing interior surfaces a dark color will help you absorb just that lit-
tle bit more heat.
But another idea deseribed in great detail in James McCullagh's
1978 book, The Solar Greenhouse Book (published by Rodale
Press, Inc) is to use water to catch and store heat.
‘The idea s similar in concept to thermal mass. Allow the water to
absorb heat during the day - then radiate it back out into the
greenhouse during the night. In this way you moderate the tem-
peratures.
‘These water storage systems can become fairly complex. But the
method we like (because it is so simple) s to use one-gallon milk
jugs filled with dyed water (remember, keep it dark) to capture the
heat.
You can line the entire inside north wall with these jugs if you wish
- or simply place them in convenient sunny spots throughout the
building. The more the merrier - and they will work best if com-
pacted together into a larger mass (creating a larger “tank” of wa-
ter -0 to speak).
The milkjugs absorb the heat of
the sun during the day, then rad-
ate it out during the night
page 15
Insulation:
Once you have captured the heat in your building - it would kind
of be nice to keepit. This is where insulation comes into play. We
could, of course, insulate the walls and ceiling in a normal fashion
~with blown or rolled insulation. But then we would block any
chance of light getting in - pretty much negating the whole reason
we built this greenhouse in the first place.
Fortunately - there is a solution in garbage. Those discarded 2-li
tle bottles can be combined to form a tube of air (we will discuss
how you do this in just a minute). And it is air, mis amigos, that
really provides insulation. Trapped air, that is.
In fact it has been demonstrated that simple trapped air is about
1/4th (inch for inch) as good an insulator as the stuff you buy in
rolls. What this means is that a sealed 4” bottle of air will insulate
about as well as a one inch layer of insulation. Not spectacular -
but good enough for our purposes.
The Bottles:
Before you begin your project, you must somehow come up with
about 1,000 empty 2-liter soft-drink bottles. Unless you consume
huge quantities of the stuff (and heaven help youf you do), you
will probably need some help. We have found that this is a great
project for schools, scout troops, or any other groups with a lot of
children.
Not only will they happily help you gather the bottles - but it gives
you a chance to lecture them on the evils of consuming sugar-
‘ter drinks (bear in mind that this lecture will go in one car and out
the other).
Kids are also a big help in washing the bottles - which has to be the
most thankless job of this project. Some labels come off easily,
some you simply cannot remove for love or money. Soapy water is
your best bet (any solvents will dissolve the bottles and are not en-
Vironmentally happy. So be prepared to work at getting them
clean.
page 16
Building With Bottles:
You will understand much when you understand that the basis of
green building (or any building process for that matter) is simply
the art of “flling space with stuff.” (And isn't that really what
America is all about?)
‘The framing of this building is what holds the building together
(and keeps the roof above your head). But the plastic bottles, as
well as the straw bale that we will use in the north wall, are just oc-
cupying sp
‘What we wish to do with the bottles is to create many long tubes
that will combine to fill the gaps between the wooden wall sup-
ports.
Cutting the Bottles:
In order to make your cylinders of air (which is what the plastic
bottles will form), you will need to cut them.
( N 1.
| ® Cutoff the bottom of the bottle just
above the slight bulge where the
bottom attaches to the midsection of
the bottle.
page 17
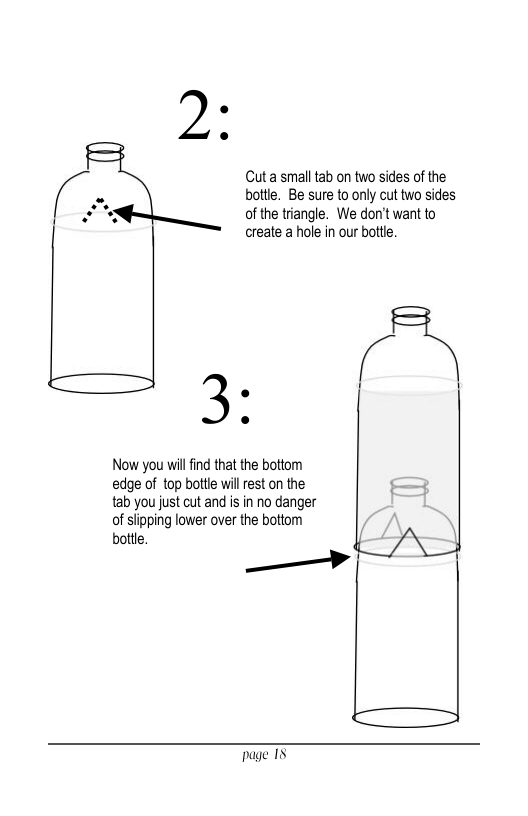
Cuta small tab on two sides of the
bottle. Be sure to only cut two sides
of the triangle. We don't want to
create a hole in our botte.
/
()
Now you wil ind that the bottom
edge of top bottle will rest on the
tab you just cut and is in no danger
of sipping lower over the bottom
bottle. )
A
page 1S
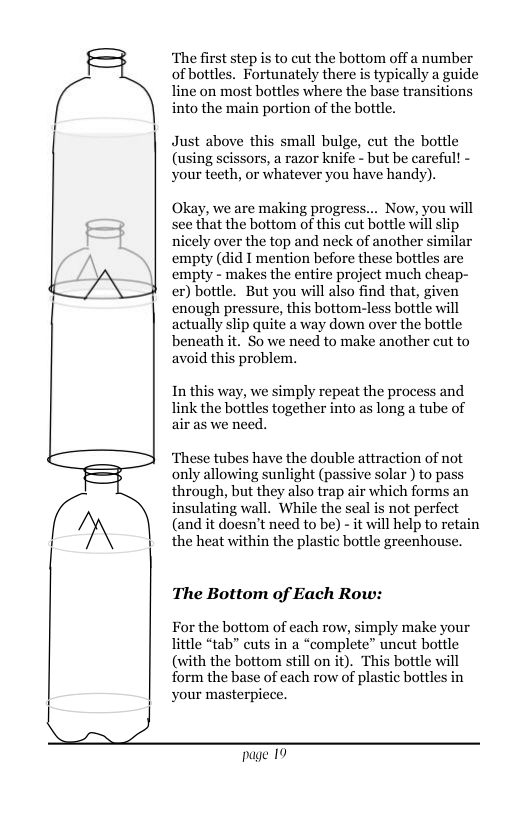
‘The first step is to cut the bottom off a number
of bottles. Fortunately there is typically a guide
line on most bottles where the base transitions
into the main portion of the bottle.
Just above this small bulge, cut the bottle
(using scissors, a razor knife - but be careful! -
your teeth, or whatever you have handy).
Okay, we are making progress... Now, you will
see that the bottom of this cut bottle will slip
nicely over the top and neck of another similar
empty (did I mention before these bottles are
empty - makes the entire project much cheap-
er) bottle. But you will also find that, given
enough pressure, this bottom-less bottle will
actually slip quite a way down over the bottle
beneath it. So we need to make another cut to
avoid this problem.
In this way, we simply repeat the process and
link the bottles together into as long a tube of
air as we need.
‘These tubes have the double attraction of not
only allowing sunlight (passive solar ) to pass
through, but they also trap air which forms an
insulating wall. While the seal is not perfect
(and it doesn't need to be) - it will help to retain
the heat within the plastic bottle greenhouse.
The Bottom of Each Row:
For the bottom of each row, simply make your
little “tab” cuts in a “complete” uncut bottle
(with the bottom still on it). This bottle will
form the base of each row of plastic bottles in
your masterpiece.
page 19
The Top of Each Row:
“To finish off the top of each row, simply measure the remaining
space you need to fillin each tube of bottles (this will be more clear
later as we show how to place the bottles), and cut a bottle to fit
In this instance, the part we want is the bottom of the bottle - not
the top.
For example, you have stacked you bottles into the space you wish
tofill, and find that at the top you have a gap of about 5 inches.
Measure up from the bottom of the bottle 6 inches, and cut it.
‘Turn the bottom of the cut bottle upside down (so the bottom is
now at the top) and use it as a cap to top off the row. If you make
it just a little long, you will find that the bottles actually have a bit
of spring (compression) that will help hold them in pla
Now, the bottom of your freshly cut bottle makes a perfect cap to
your row of bottles. And speaking of caps - you may wish to re-
move the multi-colored caps from the bottles. They will block just
atiny bit of the sun. But if you like a bit of color - leave them in.
Not a big deal either way.
Inthis example, we need a cap for
our row about 6" high (this willvary
on your project). Cut the bottle,
‘measuring from the bottorn.
6
page 20
We tum the bottom of our cut bottle
upside down and place it as the cap
ortop of our row of botes.
And there you have it. A complete row of
plastic bottles, ready for installation.
A o Forthe bottom of our row of botlles,
i > we simply take a complete, uncut
2-liter bottle, cut the tabs and place
bottles on top of it
—
page 21
Our Project:
‘The greenhouse we will use as an example in this booklet is simply
a convenient size and shape for our purposes here at Blue Rock
Station. You may wish to make yours larger - smaller - rounder -
whateverer.
But since we have to start somewhere, well, here we are.
We intend to build our greenhouse on a a rammed earth (pounded
tire) foundation. As mentioned earlier, we have a booklet that
goes into detail on how to do this - or you can research it else-
where or make up your own method. You could just as easily build
this project on a traditional foundation, a rubble foundation, or no
foundation at all (it i, after all, a greenhouse). _But, as one of our
first greenhouses blew away - we want to keep this one for a while.
So we are putting it on a foundation.
Our greenhouse tire foun-
dation midway towards
completon. Noice we eft
a space for the door
(mportant f you want to
getinside when the thing
s finished).
We also intend to use as little purchased materials as possible (we
love to scrounge and recycle things). But one thing we must pur-
chase for this project is the corrugated plastic roofing. We have
decided to use clear plastic roofing to inerease the amount of sun-
light getting into the building - but you will find that this step is
probably unnecessary - so use whatever roofing is handy.
But since we have decided on our roofing - and this roofing comes
available in sheets that are 12 feet long (a word of warning to our
friends who live outside the USA and use a sensible scale of mea-
surement - you will need to do some conversions. Sorry!), let’s
give ourselves a little overhang and make the structure about 9’ 6”
Page 22
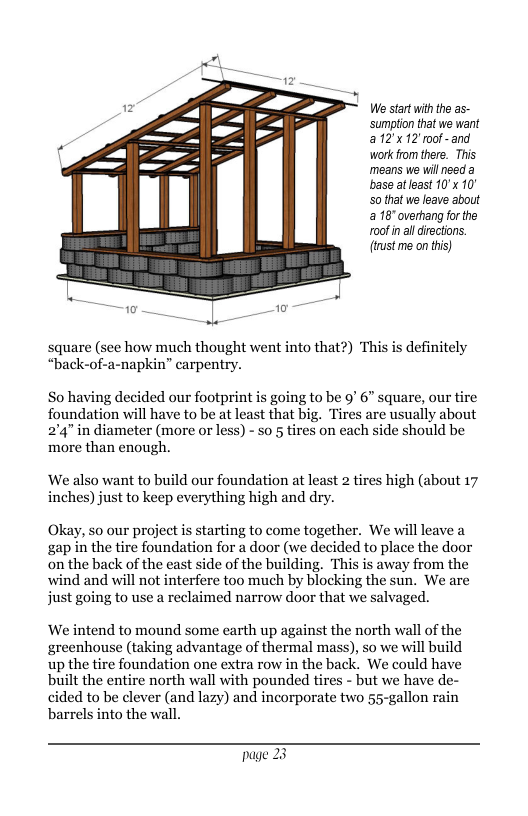
We start withthe as-
sumption tht we want
a12x12'mof-and
work rom there. This
means we will need a
base atleast 10'x 10°
50 that we leave about
a 18" overhang for the
r0ofin aldirections.
(trst me on this)
square (see how much thought went into that?) This is definitely
“back-of-a-napkin” carpentry.
So having decided our footprint is going to be 9" 6” square, our tire
foundation will have to be at least that big. Tires are usually about
2'4” in diameter (more or less) - so 5 tires on each side should be
more than enough.
‘We also want to build our foundation at least 2 tires high (about 17
inches) just to keep everything high and dry.
Okay, so our project is starting to come together. We will leave a
gap in the tire foundation for a door (we decided to place the door
on the back of the east side of the building. This is away from the
wind and will not interfere too much by blocking the sun. We are
just going to use a reclaimed narrow door that we salvaged.
We intend to mound some earth up against the north wall of the
greenhouse (taking advantage of thermal mass), so we will build
up the tire foundation one extra row in the back. We could have
built the entire north wall with pounded tires - but we have de-
cided to be clever (and lazy) and incorporate two 55-gallon rain
barrels into the wall.
page 23
‘We will then finish off the remainder of the north wall with straw
Dales.
‘The only thing left to decide s the pitch of the roof. Since this
roofing material (corrugated plastic) is not the strongest thing
known to man, we probably want a fairly steep pitch if we think we
might get any snow to amount to anything. Also, in order to cap-
ture as much sun as possible, we want to go as high as practical on
the south side, giving the face of the building a large area to collect
the rays of the sun.
We also need enough headroom in the back to avoid cracking our
(really my skull as Annie is only just over 5 feet tall) noggin. Six
feet at the back should do it. And nine fect at the front should be
more than enough.
sl pate
5 PO
0
Front View
page 21
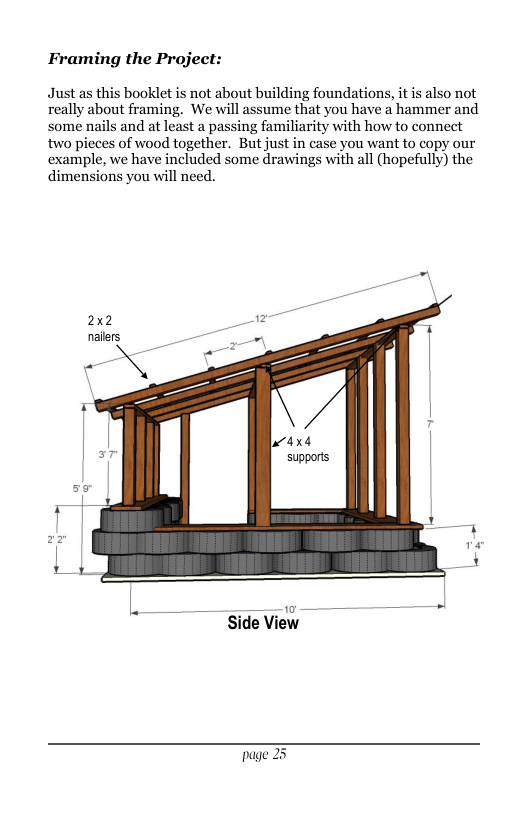
Framing the Project:
Just as this booklet is not about building foundations, it is also not
really about framing. We will assume that you have a hammer and
some nails and at least a passing familiarity with how to connect
two pieces of wood together. But just in case you want to copy our
example, we have included some drawings with all (hopefully) the
dimensions you will need.
Side View
Dage 25
The Other Side
We decided to place the door on the east side (near the
back). Sinc the door area does ot perform any support
functon -just frame it as you wish. We simply lfta gap in
the firefoundation - then found an ol door tht it the area
and framed i around it
Page 26
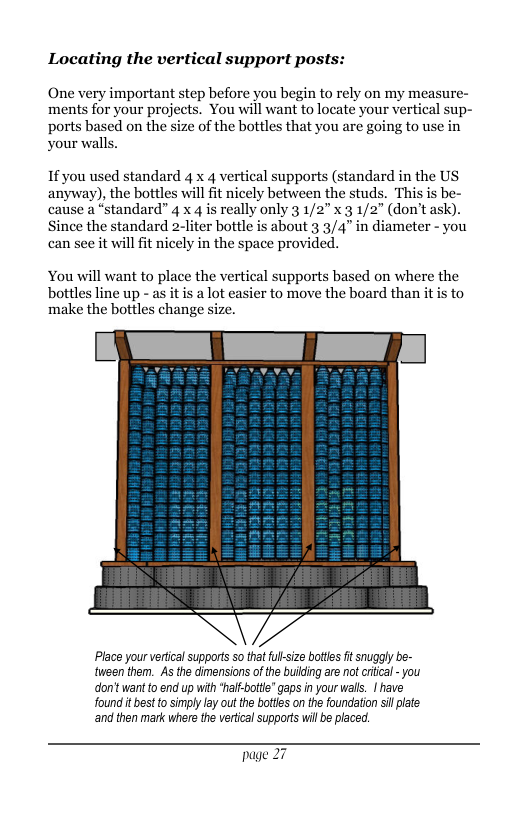
Locating the vertical support posts:
One very important step before you begin to rely on my measure-
ments for your projects. You will want to locate your vertical s
ports based on the size of the bottles that you are going to use in
your walls.
If you used standard 4 x 4 vertical supports (standard in the US
anyway), the bottles will it nicely between the studs. This is be-
cause a “standard” 4 x 4 is really only 3 1/2x 3 1/2° (don't ask).
Since the standard 2-liter bottle is about 3 3/4” in diameter - you
can see it willfit nicely in the space provided.
You will want to place the vertical supports based on where the
botles line up - as it is a lot easier to move the board than it is to
make the bottles change size.
Place your verticalsupports 5o tht fullsize botes it snuggly be-
tween them. As the dimensions o the buiding are not crica - you
don't want to end up with *alf-botte® Gaps n your wall. 1 have
found it bst to simply lay ot th bottes on the foundation sil plte
and then mark where the vertical supports wil be placed.
page 27
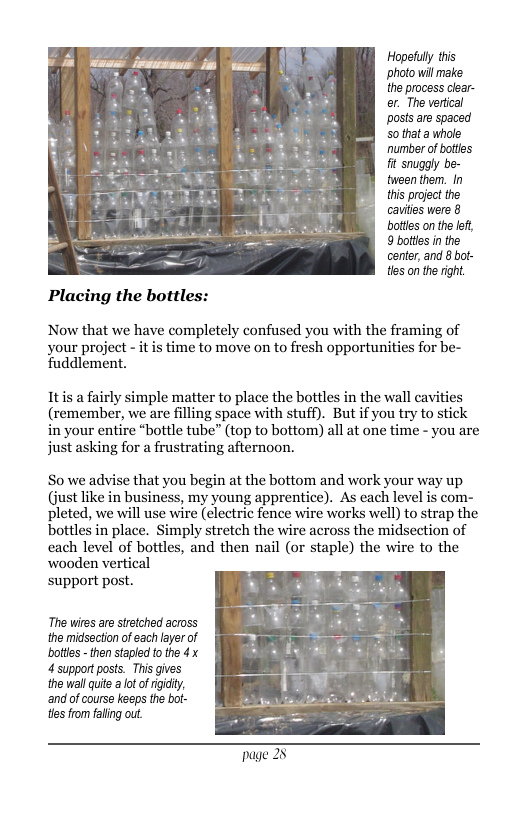
Hopetuly tis
‘photo will make
the process cear-
er. The vertical
posts e spaced
50 thata whole
number of bottles
it snugaly be-
tween them. In
this project the
cauilies were 8
bottes on the ef,
9 botlles in the
center, and 8 bot-
tles on the right
Placing the bottles:
Now that we have completely confused you with the framing of
your project - it is time to move on to fresh opportunities for be-
Tuddlement.
Itis a fairly simple matter to place the bottles in the wall cavities
(remember, we are filling space with stuff). But if you try to stick
in your entire *bottle tube” (top to bottom) all at one time - you are
just asking for a frustrating afternoon.
So we advise that you begin at the bottom and work your way up
(just like in business, my young apprentice). As each level is com-
pleted, we will use wire (electric fence wire works well) to strap the
bottles in place. Simply stretch the wire across the midsection of
cach level of bottles, and then nail (or staple) the wire to the
wooden vertical
support post.
The wires are strtched across
the midsection of each leyer of
bottes - then stapled 0 the 4 x
4 support posts. This gives
the wall quite a ot ofrigdty,
and of course keeps the bot-
tes fromfaling out
Page 25
Run the wire on both sides of the bottle (inside the
and outside). By doing this, you create a wire “sl
the bottles firmly in place.
greenhouse
e” that holds
You can make your wall even stronger and more rigid if you use a
tiny wire “clip” to clamp the two wires together, putting tension on
the bottles. This is really z orth-a-thousand-
1,000 words, I will try to illustrate it
1) cutabitof the wire you are using
into 6 inch (more or less) lengths.
2) witha pair of neeclie-nose plirs, !
tun the ends in so that the straight 312
section is about 3 % inches long.
3) Then use this ol to draw the
two wires together, getting a good
tight clamp between the wires.
Do this between every other bottle
or o on each level. You wil be-
gin to see where it needs it. After
‘you complete this step, you will be
amazed how strong your
wall has become.
page 29
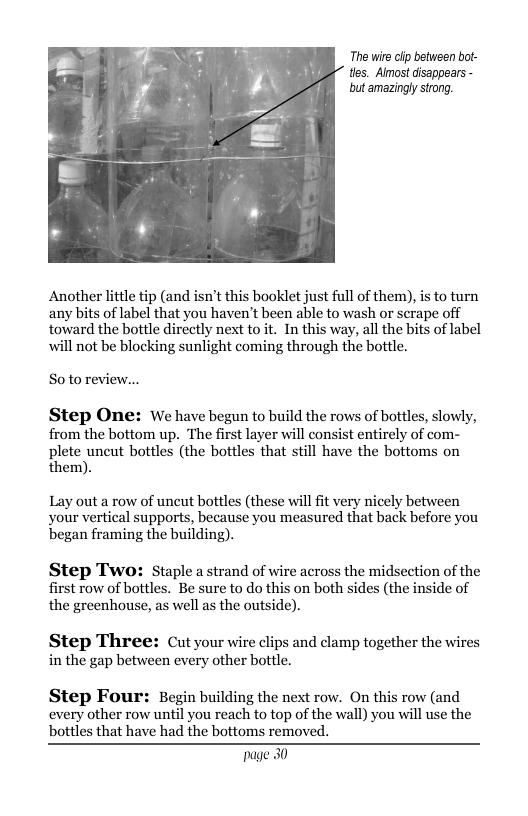
The wireclp between bot-
tles. Aimost disappears -
but amezingly strong.
Another little tip (and isn't this booklet just full of them), is to turn
any bits of label that you haven't been able to wash or serape off
toward the bottle directly next to it. In this way, all the bits of label
will not be blocking sunlight coming through the botle.
Soto review...
Step One: We have begun to build the rows of bottles, slowly,
from the bottom up. The first layer will consist entirely of com-
plete uncut ottles (the bottles that still have the bottoms on
them).
Lay out a row of uncut bottles (these will it very nicely between
your vertical supports, because you measured that back before you
began framing the building).
Step Two: Staple a strand of wire across the midsection of the
first row of bottles. Be sure to do this on both sides (the inside of
the greenhouse, as well as the outside).
Step Three: Cut your wire clips and clamp together the wires
in the gap between every other bottle.
Step Four: Begin building the next row. On this row (and
every other row until you reach to top of the wall) you will use the
botles that have had the bottoms removed.
Dage 30
As you slide the bottom of your cut bottle over the top of the bottle
beneath it, you will need to pry the two tabs out a bit, so the base
of the top bottle rests on the lttle support created by the tabs of
the bottles beneath it.
Step Five: Repeat steps 2-4 until you reach the top of the area
of wall that you are filling.
Step Six: Now we need to cut and place the cap (as we dis-
cussed back on page 20). 1 usually avoid cutting the caps until
they are needed, because the space at the top of each row will vary.
Cut the cap about an inch longer that you need - so that when you
place it - it will actually compress the entire bottle “tube” below,
giving a nice tight seal.
Step Seven: Step back and admire your work. Feel smug
about a job well done, using materials that otherwise would have
been land fill.
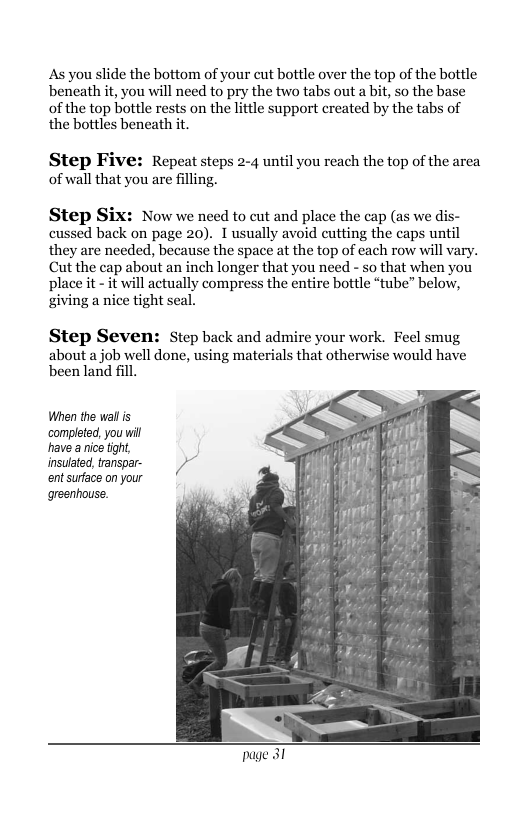
When the wall s
‘completed, you will
have a nice fight,
insulated tanspar- )~
ent surface on your
greenhouse.
Water, the other resource:
Remember, the entire reason for this building is to grow plants.
To do this, we need sunlight, heat, and... of course... Water!
So where are we going to get the water? Well, if you live near
where we live (planet earth), the water falls out of the sky. So what
do we do with this amazing, free, abundant supply of water? We
typically let it hit the ground, run into drains, wash toxic chemicals
into our rivers - then we gather it up, filter it, add chlorine, floride,
and who knows what else to it - then pump it back to the place it
fell in the first place. Oh yeah, we also get to pay for this chemical
water. (How' that for being preachy?)
So let's skip the middleman and take all the water we need right
off the roof of our cute little greenhouse.
In our example, we linked two 55-gallon rain barrels together and
integrated them into the north wall. The north wall of our green-
house is worthless as far as solar gain - so why not use it for some-
thing productive?
Also, if we paint the rain barrels black - we may just find that the
water within will heat up in the sun, and provide quite a bit of ra-
Standard quters are used .
10 collectthe rain water off =
the roof. s then char-
neledinto two rain barels
These are connected at
the botiom - 5o bothfl at
the same time with only
one nlet. Note the over-
flow pipe that allows ex-
cess waterto un away.
from the buiding. Once
these are painted black,
they wil actually absorb
heat duing the day and
radiae it back out at right
diant heat at night to help
keep our tender little sprouts
warm and cozy in the early
spring.
Another advantage of paint-
ing the tanks black, it that it
will warm the cold water in
the winter, avoiding sending
your seedlings or greens into
Shock by dowsing them ina
cold shower each morning.
Of course, once you have
gathered your water, you will
need to get at it. Most rain
barrels come equipped with
aspigot. If you are making
your own - be sure to orient
the intake and overflow to the outside of the greenhouse - and
keep the spigot on the inside.
‘The rest of the north side of the greenhouse, we simply finished off
in straw bale. A good coating of earth plaster will make this por-
tion quite attractive (but then - all that is discussed in another
book).
Another quick word about wind, heat and cold:
After having completed the greenhouse walls, you will no doubt
notice (observant as you are) that the seal between the rows of bot-
tles is not absolute.
“Will this not allow warm air to escape?” “Won't cold winds roar
through my lovely building, harming my precious plants?”
Our answer to this is... “Perhaps.”
page 33
Our goal with this greenhouse is to extend the growing season.
But bear in mind that this building (as designed) does not have a
heating system (like a wood stove) that will protect our plants dur-
ing extreme (we are talking -10°F temperatures here) weather. So
there are some limitations.
Normally, when you stand inside the building you cannot fee]
breeze - even if it is quite windy outside. The trapped air (within
and around the bottles) appears to create a pretty effective seal.
However, during gale-force winds I would not want to bet the
ranch that this seal will remain as effective.
‘With this in mind, you may want to rig up a system of tarps or
blankets that can be lowered around the bottle walls to protect the
buildings contents during extremely harsh weather. That way you
can tuck your plants in during a storm and keep them cozy.
Alternatively, you may also want to rig up some blinds to limit the
amount of sun coming into your greenhouse - as, even on a very
cold sunny day - it can get pretty warm inside.
Finishing off your project:
Now s your chance to get creative. At this stage you have a room
(about 8 square of usable space). Plenty of room to begin a rela-
tively aggressive home garden.
But to be a truly effective work space, you will need a few things.
‘These may include:
Atable
Storage for tools & supplies
Shelves for your plants
Potting soil container
And even the kitchen sink (use your imagination - Annie incor-
porated an old cast iron bathtub to grow greens)
Suddenly 8 x 8’ doesn't seem so terribly big. But f you are effi-
cient in your design - it is plenty. Enjoy!
page 31
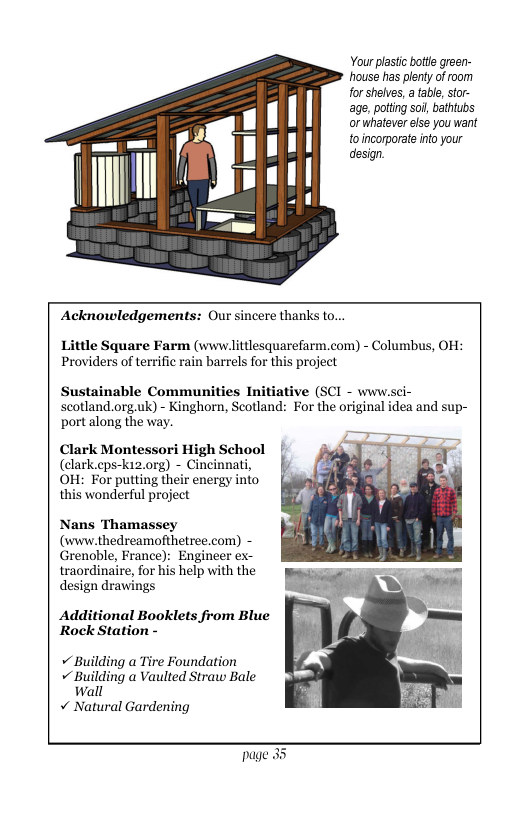
Your plastc bote green-
house has plenty of oom
for shelves, a tabl, tor-
age, potting sol, bathtubs
or whatever else you want
toincorporate into your
design.
Acknowledgements: Our sincere thanks to...
tile Square Farm (www.littlesquarefarm.com) - Columbus, OH:
Providers of terrific rain barrels for this project
Sustainable Communities Initiative (SCI - www.sci-
scotland.org.uk) - Kinghorn, Seotland: For the original idea and sup-
port along the way.
Clark Montessori High School
(clark.cps-ki2.org) - Cincinnati,
OH: For putting their energy into
this wonderful project
Nans Thamassey
(vww.thedreamofthetree.com) -
Grenoble, France): Engineer ex-
traordinaire, for his help with the
design drawings
Additional Booklets from Blue
Rock Station -
+ Building a Tire Foundation
+ Building a Vaulted Straw Bale
wall
v Natural Gardening
page 3
About the Authors:
Anrie and Jay Warmke are having the tme of their Iives - creating and run-
ning Blue Rock Staton. a sustainzble living center near Philo. Ohio. Besides
being full time grandparents they raise llamas and rare-breed chickens. milk
‘oats.conduct tours of ther home (an Earthship) they buit out of
‘garbage. serve on several Tocal lie-changing & patieic:
are aid readers of THE GUARDIAN.their iavorite British newspaper.
Annie Warmke is a noted acthist and witer - as well 2 an alumi of Ohio
. Her career spans a ietime of working with and witing about
s translated for SOS FEMMES, led
throwing more mud and building more botte walls than
. She also decided that a tire foundation on the grees
ouse might keep it rom blowing aw
Jay Warmke obtzined his degree in joumalisn irom Ohio University. leaming
15t cnough about ournalism 10 know he never wanted 0 be one. e lter
enrolled in the BA progam at the University of South Florida - atiemping to
Team a bit about business. He should have known better.
Aiter wor
Towed a ypical career path - |
ng in the conic book industry for a number of years. he then fol-
s behind to become executive direc-
tor of one o the worlds largest telecommunications associations. Shorty aiter
being named one of the top ten most ‘people in the telecommunic:
tions industry by Cabling & Installation Maintenance Magazine. he decided it
was time 10 leave (i he was the best they had. the whole indusiry must be
troubie)
“Through it al.Jay maintained a fove of building and carpentry - determined
that whert he had enough of e in an ofice - he would chuck it al and be-
come a simple carpenter. Haxing now achieved at least hal his goal (he s
ple part he s still working on the carpenter bi) he continues to experiment
with and practice aliemative buiding techniques,
Page 30